

Clip Studio Paint How To Install Gradient Set
Gradient map [PRO/EX]
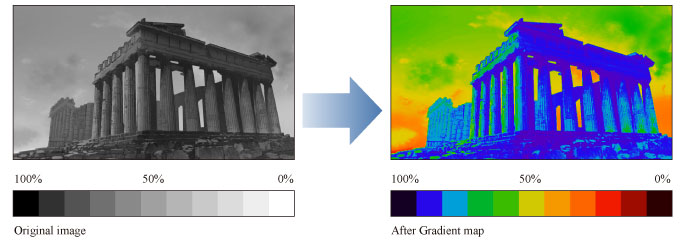
Select the [Edit] carte > [Tonal Correction] > [Gradient map] to open the dialog box. This converts the selected layer to the colors of the gradient, based on the density of the original colors.
| Applicative layers | Raster layer (colour) |
| ·To learn how to utilize a Tonal Correction event to a layer, see "Applying a Tonal Correction ". ·For data on the settings in the [Slope map] dialog box, please see the following section. |
[Slope map] dialog box
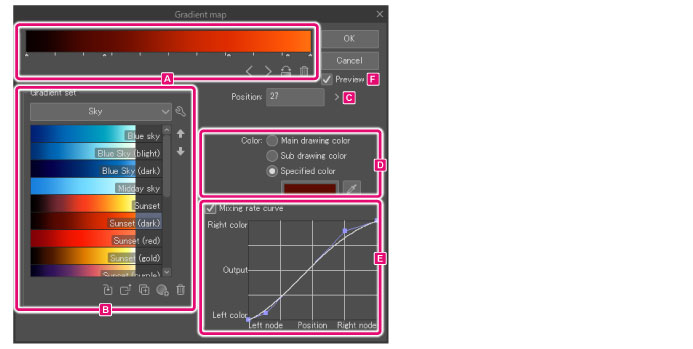
A.Gradient settings
Yous can edit the slope by moving the nodes.

(1)Color bar
A preview of the gradient.
(2)Node
Set the color of the slope. You tin can create actress nodes past clicking an empty space.
Drag the nodes horizontally to accommodate the slope. Selected nodes are shown in bluish.
To delete a node, drag information technology up or downwardly from the gradient bar.
(iii)Select left node
Switches to the next node on the left.
(4)Select right node
Switches to the next node on the right.
(v)Opposite slope
Flips the gradient colors.
(half dozen)Delete node
Deletes the selected node.
B.Gradient set
Here you can manage the gradient settings.
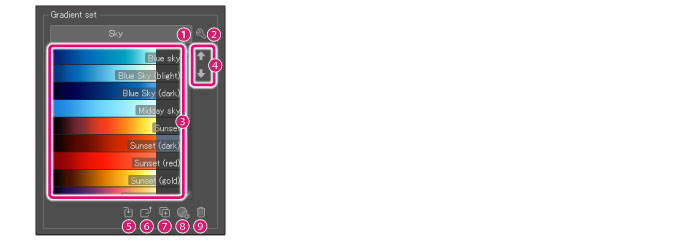
(1)Slope set lists
Displays a list of gradient sets y'all tin select from.
(two)Show Menu
Opens the gradient set carte.
| Create new fix | Creates a new colour gradient set. |
| Delete set | Deletes the selected gradient set. |
| Indistinguishable prepare | Duplicates the selected gradient set. |
| Settings of set | Change the proper noun of the selected gradient set. |
| Register ready every bit material | Displays the [Material belongings] dialog box and allows you to annals the selected slope set to the [Materials] palette. For details on the [Material property] dialog box, see "[Material property] Dialog Box ". |
| Import material set | Opens the [Import cloth set] dialog box, where you can import a slope set registered to the [Materials] palette. For details on the [Import cloth set] dialog box, see "[Import fabric set up] dialog box ". |
| Add Gradient | Add together the settings of the gradient displayed on the color bar to the listing. The added gradient settings are displayed at the bottom of the list. |
| Delete Gradient | Deletes the selected gradient from the list. |
| Duplicate Gradient | Duplicates the selected slope. |
| Change Gradient Name | Modify the name of the selected gradient. |
| Replace Gradient | Overwrites the selected gradient with the slope displayed in the color bar. |
| Apply to Slope Settings | Shows the selected gradient in the color bar. |
| Import Slope | Import a gradient settings file from IllustStudio (extension: cgs). Gradient settings file from IllustStudio (extension: cgs) cannot be imported on tablets/smartphonea/Macs with M1 chips. |
| ·Slope sets registered to the [Material] palette can be uploaded to the Prune Studio server using Clip Studio, the portal application. For details on uploading methods, delight see Prune Studio TIPS. ·Clip Studio can be started from the [File] menu ([CLIP STUDIO PAINT] menu on macOS and Tablet) > [Open up CLIP STUDIO]. For the Smartphone, select [Menu] > [Usage / Material / Work / Back up]. |
(iii)Gradient list
A list of gradients in the selected gradient fix.
(four)Up/Down
Motility the position of the gradient selected in the listing up or downward.
(5)Supervene upon Gradient
Overwrites the selected gradient with the slope displayed in the color bar.
(vi)Apply to Gradient Settings
Shows the selected gradient in the colour bar.
(7)Duplicate Gradient
Duplicates the selected slope.
(8)Add Slope
Adds the slope displayed on the color bar to the list. The new gradient is added to the bottom of the listing.
(nine)Delete Gradient
Deletes the selected gradient from the list.
C.Position
Indicates the position of the selected node.
D.Color
Indicates the color of the selected node.

(one)Principal drawing color
Uses the main drawing color as the node color. If you change the main drawing color with a color palette, the node color will also change.
(2)Sub drawing color
Set the sub drawing color for node color. If yous alter the sub cartoon colour with a colour palette, the node color will also change.
(3)Specified color
Set a specified color for node color. Click the color indicator to open the [Color settings] dialog box.
(4)Obtain screen colour [Windows/macOS]
Yous can use the eyedropper to pick a colour from the screen as the specified color.
Eastward.Mixing rate bend
Allows you to adjust the change in color between the selected node and the node to the correct.
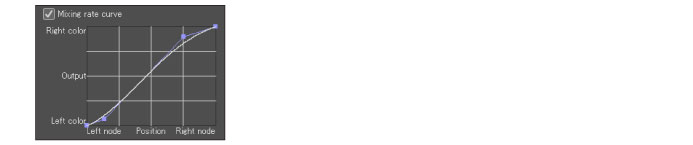
·The horizontal centrality of the graph indicates the position of the nodes.
·The vertical axis of the graph indicates the colour mixing ratio with respect to the node at the right. When the value is larger, the color betwixt the nodes volition be closer to the color of the node to the right. When the value is lower, the color betwixt the nodes volition exist closer to the color of the selected node.
·Clicking on the curve allows you lot to add up to xvi points. which you can drag to adjust the mixing charge per unit curve. To delete a command point, drag it outside the graph.
F.Preview
Plough this on to preview the results on the sail.
[Fabric property] Dialog Box
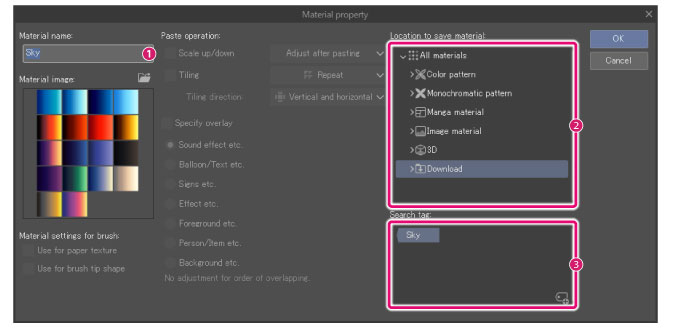
(1)Material name
Enter a name for the material.
(2)Location to save fabric
Click a folder in which to save the material. The saved location volition exist applied to the tree view in the [Materials] palette.
(3)Search tag
Hither you can specify the search tag that will appear in the tag list.
Click plus icon in the lower correct to create a new tag.
[Import cloth set] dialog box

(one)Search box
Enter a keyword to search for a gradient fix image.
(ii)Tag list
A list of tags assigned to materials. Clicking the push shows the [Gradient set list] from the specified settings in [Gradient prepare].
(3)Gradient set list
Displays the list of gradient sets.
(four)Show particular check box
Shows a checkbox for each slope prepare thumbnail in the list. You can select a textile past clicking the checkbox.
(five)Big Thumbnails
Shows the gradient sets equally big thumbnails.
(vi)Pocket-sized Thumbnails
Shows the gradient sets as small thumbnails.
(vii)Detail View
Shows thumbnails and details of the slope sets.
Source: https://www.clip-studio.com/site/gd_en/csp/userguide/csp_userguide/500_menu/500_menu_layer_shikichou_guradation.htm
0 Response to "Clip Studio Paint How To Install Gradient Set"
Post a Comment